Showing posts with label Android Tutorial. Show all posts
Android :
Formats supported : PNG, JPEG, JPG, SVG, 9-Patch images (Recommended)


Screen Portrait Landscape
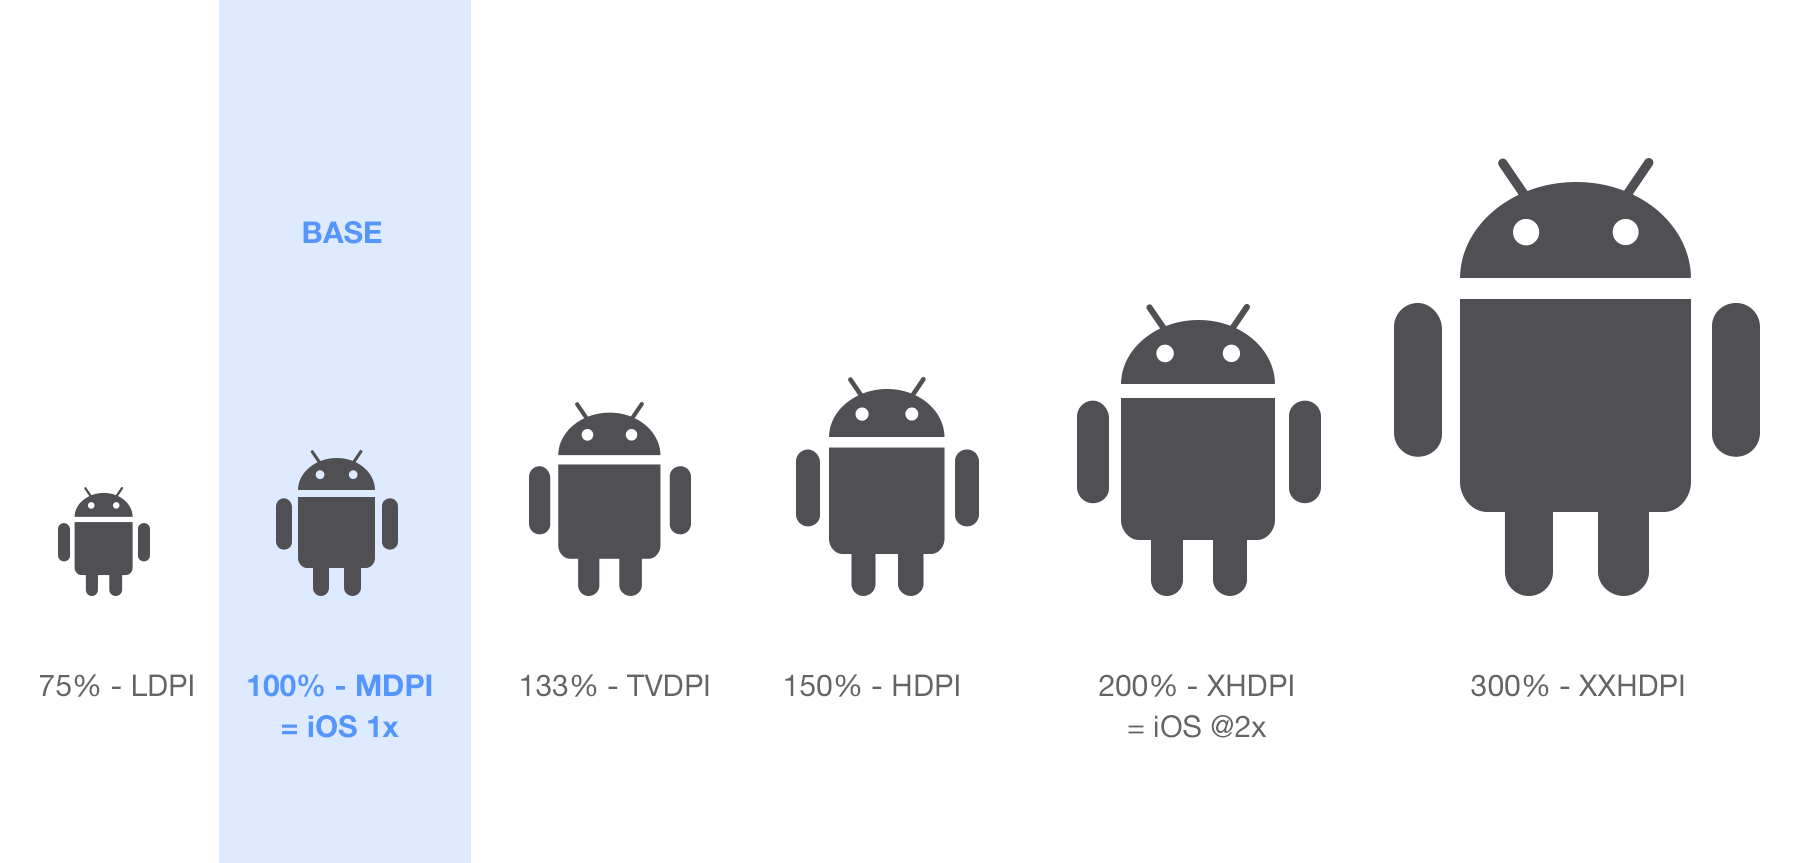
LDPI 200x320px 320x200px
MDPI 320x480px 480x320px
HDPI 480x800px 800x480px
XHDPI 720px1280px 1280x720px
XXHDPI 960px1600px 1600x960px
XXXHDPI 1280px1920px 1920x1280px


iOS :
Formats supported : PNG

Tablet (iPad)
Non-Retina (1x)
Portrait: 768x1024px
Landscape: 1024x768px

Retina (2x)
Portrait: 1536x2048px
Landscape: 2048x1536px

Handheld (iPhone, iPod)
Non-Retina (1x)
Portrait: 320x480px
Landscape: 480x320px

Retina (2x)
Portrait: 640x960px
Landscape: 960x640px

iPhone 5 Retina (2x)
Portrait: 640x1136px
Landscape: 1136x640px

iPhone 6 (2x)
Portrait: 750x1334px
Landscape: 1334x750px

iPhone 6 Plus (3x)
Portrait: 1242x2208px
Landscape: 2208x1242px

Overview
Android Material Design gives new visual language that synthesizes classic principles of good design with the innovation and possibility of technology and science.
  • Rational space and a system of motion.
  • Print based design(typography,grids,space,scale,color and use of imagery).
  • Motion is meaningful.
Material Environment:

Android Material Design is gives 3D world which means all objects have x,y,and z dimensions. It contains Shadow and Light effects to all object .


Material Properties:

  1. Physical Properties – it can vary x & y dimensions and not Z dimension (it should be uniform thickness).
  2. Transform Properties – it can grow and shrinks only along its plane.(never bends or folds).
  3. Movement Properties -it moves along any axis with its plane .

Material Elevation and Shadow:
  1. Elevation – it is relative depth between two surfaces objects along the z-axis
  2. Shadow – it gives objects depth and directional movement . It indicates the amount of separation between surfaces.
  3. Object relationship – Object can move independently of each other .Parent-Child Relationship . The child in each of these relationship refers to an element that is a subordinate to its Parent element.

Elevation (dp)
Component
24
Dialog
Picker
16
NavDrawer
RightDrawer
ModalBottomSheet
12
Floating action button
9
Sub-menu(+1dp for each sub menu)
8
Menu
Card
Raised Button
6
Floating action button(Resting elevation)
Snackbar
4
AppBar
3
Refresh indicator
Quick entry/Search bar(Scrolled state)
2
Card(Resting)
Raised button(Resting)
Quick entry /Search bar(Resting)
1
Switch

Consistent choreography:

Secondary color:
Grid:
Parent to Child: Exploring deeper levels, or screens, of an app is a hierarchical journey that starts at a parent screen. From there, a user can explore multiple possible sub- screens, which are children to the parent screen.

Animation:

Responsive Interaction:

  • Touch, voice, mouse, and keyboard are all equally important input methods.
  • UI elements appear tangible, even though they are behind a layer of glass (the device screen). To bridge that gap, visual and motion cues acknowledge input immediately and animate in ways that look and feel like direct manipulation.
Responsive interaction elevates an application from an information-delivery service to an experience that communicates using multiple visual and tactile responses.

1.Surface Reaction:
Instant visual confirmation at the point of contact :under the pad of a finger for touch, at the microphone for voice, or in the appropriate field for a keyboard press.

2.Material Response:
Like surface reactions, material can lift up when touched, indicating an active state. On touch, the user can generate new or transform existing material, or directly manipulate sheets of material by dragging or flinging them. Material can be resized linearly or radially.

3.Radial Action:
Add clarity to user input through visual reactions to user input. Radial action is the visual ripple of ink spreading outward from the point of input.

Transitions

Visual Continuity :
Transitioning between two visual states should be clear, smooth, and effortless. A well-designed transition tells the user where to focus their attention.

Hierarchical Timing:
When building a transition, consider the order and timing of element movement. Ensure that motion supports the information hierarchy, conveying what content is most important by creating a path for the eye to follow.

The paths elements travel along should make sense and be orderly and in coordinate manner.


Style:
Color palette:
Google suggests using the 500 colors as the primary colors in your app and the other colors as accents colors in Android Material Design.
Primary color:
When using a primary color in your palette, this color should be the most widely used across all screens and components.
Palettes with a secondary color may use this color to indicate a related action or information. The secondary color may be a darker or lighter variation of the primary color.
Accent color:
The accent should be used for the floating action button and interactive elements, such as:
Text fields and cursors,Text selection,Progress bars,Selection controls, buttons, and sliders,Links.
Layouts:
Metrics & key lines:
Baseline grids:
All components align to an 8dp square baseline grid for mobile, tablet, and desktop. Iconography in toolbars align to a 4dp square baseline grid.  
Key-lines & Spacing:
key lines, spacing guidance, and sample screens for elements on mobile, tablet, and desktop.
Statusbar:24dp
Title:80dp
Subtitle: 48dp
List Item:72dp
Toolbar: 56dp
Account menu and list items: 48dp
Space between content areas: 8dp
Navigation right margin: 56dp
Screen edge left and right margins: 24dp
Content left margin from screen edge: 80dp
Card left and right padding: 24dp
Card content left padding: 104dp
Status bar and space above list: 24dp
Space between content areas: 8dp
Screen edge left and right padding: 24dp
Icons’ vertical center distance from screen edge: 52dp
Nav item left padding from screen edge: 104dp
Content left margin from screen edge: 80dp
Card left and right padding: 32dp
Card nav item left padding: 96dp
Subtitle, list item, and slider: 48dp

Material designs responsive UI is based on a 12-column grid layout. This grid creates visual consistency between layouts, while allowing flexibility across a wide variety of designs. The number of grid columns varies based on the breakpoint system.


Components:
Bottom Sheets
A bottom sheet is a sheet of material that slides up from the bottom edge of the screen. A bottom sheet can be a temporary modal surface or a persistent structural element of an app.

1.Modal bottom sheets slide in over an app’s content.
2.Persistent bottom sheets are an integral part of an app’s layout.
Font and color
  • Text: Roboto Regular 16sp,  #000 87%
  • Title (optional): Roboto Regular 16sp, #000 54%
  • Default bottom sheet background fill: #FFF
  • Transparent overlay fill: #000 20%
Button:
A button clearly communicates what action will occur when the user touches it. It consists of text, an image, or both, designed in accordance with your app’s color theme.

There are three standard types of buttons:
  • Floating action button: A circular material button that lifts and displays an ink reaction on press.
  • Raised button: A typically rectangular material button that lifts and displays ink reactions on press.
  • Flat button: A button made of ink that displays ink reactions on press but does not lift.
Card: A card is a sheet of material that serves as an entry point to more detailed information. A card could contain a photo, text, and a link about a single subject.
Card collections only scroll vertically.
Cards can be constructed using blocks of content which include: 1. An optional header 2. A primary title 3. Rich media 4. Supporting text 5. Actions
Metrics & Key-line in Cards :
Primary title top padding: 24dp Primary title bottom padding: 16dp Action button row padding: 8dp Supporting text top padding: 16dp Supporting text bottom padding: 24dp Supporting text: 14sp
Elevation Card resting elevation: 2dp Card raised elevation: 8dp
Chip: Complex entities in small block .it may contain photo,short title and brief information. it may also contain icon.
Snackbars: Snackbar appears on the bottom of the screen for showing a brief information.it can contain an action and only one snackbar on screen at a time.
Steppers: Steppers covey progress through numbered steps.
Tabs: Switch between different views or functional aspects of an app. Tabs control the display of content in a consistent location.
Text fields: User to input text,select text and lookup data .
Tooltips: Tooltips are labels that appear on hover and focus when the user hovers over an element with the cursor, focuses on an element using a keyboard (usually through the tab key), or upon touch (without releasing) in a touch UI.
Patterns:
Fingerprint:
Fingerprint detection can be used to unlock a device, sign in to apps, and authenticate purchases with Google Play and some third-party apps.
Fingerprint is not as secure as a strong PIN or password.

Permissions:
Permission requests should be simple, transparent, and understandable. When requesting access, apps should ensure that either the feature itself or an explanation provided makes it clear why a permission is needed.
Runtime Permissions:
Apps may request permission to access information or use device capabilities at any time after installation. When a user needs to perform an action in an app, such as using the device camera, the app may request permission at that moment.
Users may also allow or deny the permissions of any app from Android Settings anytime after installation.
Denied Permissions:
Provide feedback whenever a permission is denied.
Navigational Transitions: Movements between states in an app such as from a high-level view to a detailed view. Most, but not all, transitions are hierarchical in nature.

Sibling to Sibling: Sibling transitions are transitions that occur between elements at the same level of hierarchy

React Native
React Native enables you to build world-class application experiences on native platforms using a consistent developer experience based on JavaScript and React. The focus of React Native is on developer efficiency across all the platforms you care about - learn once, write anywhere. Facebook uses React Native in multiple production apps and will continue investing in React Native.
http://facebook.github.io/react-native/


NativeScript
Open Source framework for building cross-platform truly native iOS, Android and Windows mobile apps using JavaScript.


JUniversal
JUniversal makes Java truly cross platform
Writing the same code from scratch for every platform is a pain & inefficient. There must be a better way. JUniversallets you write code in Java (like you probably already do if you develop for Android) and take that code to places you never thought it could go. It’s primarily targeted to sharing code across mobile apps, but the technology can extend to non-mobile scenarios as well.


Intel® XDK
Intel® XDK HTML5 Cross-platform Development Tool provides a simplified workflow to enable developers to easily design, debug, build, and deploy HTML5 web and hybrid apps across multiple app stores, and form factor devices.
Experience Intel® XDK - the easy and fast way to get your apps to market.
Ecere
Cross Platform SDK with C-styled object oriented language, GUI toolkit, powerful 2D/3D engine and IDE.

Appcelerator (Titanium Mobile)
Enterprise Mobile Application Development Platform.

Ionic
The beautiful, open source front-end framework for developing hybrid mobile apps with HTML5.

Corona SDK
Corona SDK is the leading mobile development framework. Build high-quality apps and games for iOS, Android, Kindle Fire and Nook in record time.

PhoneGap
PhoneGap is a free and open source framework that allows you to create mobile apps using standardized web APIs for the platforms you care about.

Adobe AIR
The Adobe® AIR® runtime enables developers to package the same code into native apps for Windows and Mac OS desktops as well as iPhone, iPad, Kindle Fire, Nook Tablet, and other Android devices.

Unity (PAID)
Unity3D is a cross-platform game engine with a built-in IDE developed by Unity Technologies. It is used to develop video games for web plugins, desktop platforms, consoles and mobile devices.

Basic4android (PAID)
Basic4android is the simplest and most powerful Rapid Application Development (RAD) tool available for the Android platform.

Xamarin (PAID)
Create native iOS, Android, Mac and Windows apps in C#.

Telerik Platform (PAID)
The only modular platform that combines a rich set of UI tools with powerful cloud services to develop web, hybrid and native apps.


After Long search finally your Android-Action find out a solution for changing image resolution ie. dpi/ppi.

Dots per inch (DPI) in this context, refers to the smallest amount of ink that a given printer can print. Put another way, the more dots that a printer (or imagesetter) can apply per inch, the higher the resolution (and therefore quality of image reproduction) an imaging device can reproduce. (Source : designtalkboard)

Pixels per inch (PPI) is often used interchangeably with DPI. PPI is, arguably, where the confusion started from in the first place. PPI a somewhat relative term. Once a photograph is opened in a program such as Adobe Photoshop and displayed on a computer screen, its relation to print paradigm concepts such as per inch are not always helpful. In many cases it is actually more helpful to talk about the total width and height of the digital image in pixels, rather than pixels per inch or dots per inch. (Source : designtalkboard)


Convert image to bitmap using BitmapFactory, then convert to byte[] array(ByteArray) that will store the Bitmap.compress(). From ByteArray


 ByteArrayOutputStream image_barr = new ByteArrayOutputStream();  
 input.compress(Bitmap.CompressFormat.JPEG, 100, image_barr);  
 byte[] image_byte = image_barr.toByteArray();

Based on the JFIF structure we need to edit 13th, 14th, 15th, 16th, and 17th indexes in the byte array. 

13th index             - Density
14th & 15th index        - X resolution
16th & 17th index        - Y resolution
For example if we need to set for 500dpi as the X and Y resolution, then convert decimal to hex value [use this link for conversion binaryhexconverter]

So 500  = 1F4

 image_byte[13] = 00000001;  
 image_byte[14] = 00000001;  
 image_byte[15] = (byte) 244  
 image_byte[16] = 00000001;  
 image_byte[17] = (byte) 244  

As the same for 200 dpi hex value is C8


 image_byte[13] = 00000001;  
 image_byte[15] = (byte) 200  
 image_byte[17] = (byte) 200  


Intro:
In-app Billing is a Google Play service that lets you sell digital content from inside your applications. You can use the service to sell a wide range of content, including downloadable content such as media files or photos, virtual content such as game levels or potions, premium services and features, and more.

Steps to integrate into an Android Application:


 1. Create sign apk for your application.
 2. Upload your apk on Google play store.
 3. Create product for your application.
 4. Wait for 6-12 hour for update item’s on Play store.
 5. Copy Key of your Google account and paste it into BillingSecurity
 String base64EncodedPublicKey = "PUT YOUR PUBLIC KEY HERE";  

 6. Give Billing permissions in Manifest.xml
 <uses-permission android:name="com.android.vending.BILLING" />  

 7. Install the Google Play Billing Library of Extrafolder in Sdk.
 8. Adding the InAppBillingService.aidl File to the Project.
 9. Adding the Utility Classes to the Project
      Eg: <sdk path>/extras/google/play_billing/samples/TrivialDrive
 10. Google Play Developer Console and Google Wallet Accounts
 Each application developer making use of Google Play billing must be identified by a unique public license key. The only way to obtain a public license key is to register an application within the Google Play Developer Console. If you do not already have a Google Play Developer Console account, go to http://play.google.com/apps/publish and follow the steps to register as outlined in the chapter entitled Signing and Preparing an Android Application for Release.   

 11. Obtaining the Public License Key for the Application


 From the home page of the Google Play Developer Console, click on the Add new application button, specifying the default language and a title of InAppBilling. Once this information has been entered, click on the Upload APK button  

 12. Setting Up Google Play Billing in the Application


 String base64EncodedPublicKey = "<your license key here>";(Already mentioned above )  
          mHelper = new IabHelper(this, base64EncodedPublicKey);  
          mHelper.startSetup(new   
                IabHelper.OnIabSetupFinishedListener() {  
                  public void onIabSetupFinished(IabResult result)   
                 {  
                if (!result.isSuccess()) {  
                 Log.d(TAG, "In-app Billing setup failed: " +   
                          result);  
                } else {         
                     Log.d(TAG, "In-app Billing is set up OK");  
                 }  
               }  
          });  

 13. Initiating a Google Play In-app Billing Purchase
        eg:InAppBillingActivity.java file and adding the code for the buyClick method so that it reads as follows


 public void buyClick(View view) {  
           mHelper.launchPurchaseFlow(this, ITEM_SKU, 10001,    
                     mPurchaseFinishedListener, "mypurchasetoken");  
      }  

 14. Implementing the onActivityResult Method
       When the purchasing process returns, it will call a method on the calling activity named onActivityResult.


 @Override  
      protected void onActivityResult(int requestCode, int resultCode,   
         Intent data)   
      {  
           if (!mHelper.handleActivityResult(requestCode,   
              resultCode, data)) {     
              super.onActivityResult(requestCode, resultCode, data);  
       }  
      }  

 15. Implementing the Purchase Finished Listener
 IabHelper.OnIabPurchaseFinishedListener mPurchaseFinishedListener   
      = new IabHelper.OnIabPurchaseFinishedListener() {  
      public void onIabPurchaseFinished(IabResult result,   
           Purchase purchase)   
      {  
        if (result.isFailure()) {  
         // Handle error  
         return;  
       }     
       else if (purchase.getSku().equals(ITEM_SKU)) {  
         consumeItem();  
        buyButton.setEnabled(false);  
      }  
   }  
 };  

 16. Consuming the Purchased Item
 public void consumeItem() {  
      mHelper.queryInventoryAsync(mReceivedInventoryListener);  
 }  
 IabHelper.QueryInventoryFinishedListener mReceivedInventoryListener   
   = new IabHelper.QueryInventoryFinishedListener() {  
        public void onQueryInventoryFinished(IabResult result,  
         Inventory inventory) {  
         if (result.isFailure()) {  
            // Handle failure  
         } else {  
          mHelper.consumeAsync(inventory.getPurchase(ITEM_SKU),   
                mConsumeFinishedListener);  
         }  
   }  
 };  
  As with the query, the consumption task is also performed asynchronously and, in this case, is configured to call a listener named mConsumeFinishedListener when completed. This listener now needs to be implemented such that it enables the “Click Me!” button after the item has been consumed in the billing system:  
 IabHelper.OnConsumeFinishedListener mConsumeFinishedListener =  
       new IabHelper.OnConsumeFinishedListener() {  
        public void onConsumeFinished(Purchase purchase,   
        IabResult result) {  
       if (result.isSuccess()) {                    
              clickButton.setEnabled(true);  
       } else {  
           // handle error  
       }  
  }  
 };  

 17. Releasing the IabHelper Instance
 Remaining in the InAppBillingActivity.java file, override the onDestroy() activity lifecycle method as follows:  
     @Override  
     public void onDestroy() {  
      super.onDestroy();  
      if (mHelper != null) mHelper.dispose();  
      mHelper = null;  
    }  

 18. Modifying the Security.java File
 public static boolean verifyPurchase(String base64PublicKey,   
      String signedData, String signature) {  
     if (TextUtils.isEmpty(signedData) ||   
         TextUtils.isEmpty(base64PublicKey) ||  
         TextUtils.isEmpty(signature)) {  
       Log.e(TAG, "Purchase verification failed: missing data.");  
       if (BuildConfig.DEBUG) {  
         return true;  
       }  
       return false;  
     }  
     PublicKey key = Security.generatePublicKey(base64PublicKey);  
     return Security.verify(key, signedData, signature);  
   }  

Reference:
Techotopia - Google Play In-app Billing

Javacodegeeks
Intro:
This project allows you to calculate the direction between two locations and display the route on a Google Map using the Google Directions API.

Github Link:
https://github.com/jd-alexander/Google-Directions-Android

Screenshot:

Sample:
The sample makes use of the Google Places API for Android in order to provide a real life example of how the library can be used.
Directions Sample App


In Android, this form validation lib simplify and streamline the code to validate a form. It validates all type of EditText. It is used for all validation like
* Email
* Credit card Exp Year,Month, cvv

* Username
* Required Fields etc


 public class Formvalidation {  
      Context context;  
      EditText Username, Password, PhoneNumber;  
      static String emailPattern = "[a-zA-Z0-9._-]+@[a-z]+\\.+[a-z]+";  
      public Formvalidation(Context context) {  
           this.context = context;  
      }  
      public static boolean isFirstName(EditText Et_Firstname) {  
           return Et_Firstname.getText().toString().isEmpty() ? false : true;  
      }  
      public static boolean isLastName(EditText Et_LastName) {  
           return Et_LastName.getText().toString().isEmpty() ? false : true;  
      }  
      public static boolean isUsername(EditText Et_Username) {  
           return Et_Username.getText().toString().isEmpty() ? false : true;  
      }  
      public static boolean isEmailValid(EditText Et_Username) {  
           return !Et_Username.getText().toString().matches(emailPattern) ? false : true;  
      }  
      public static boolean isConformPassword(EditText Et_ConformPassword) {  
           return Et_ConformPassword.getText().toString().isEmpty() ? false : true;  
      }  
      public static boolean isPassword(EditText Et_Password) {  
           return Et_Password.getText().toString().isEmpty() ? false : true;  
      }  
      public static boolean isPasswordMinLength(EditText Et_Password) {  
           return Et_Password.getText().toString().trim().length()<6 ? false : true;  
      }  
      public static boolean isConformPasswordMatch(EditText et_Password,  
                EditText et_ConformPassword) {  
           // TODO Auto-generated method stub  
           return !et_Password.getText().toString()  
                     .equals(et_ConformPassword.getText().toString()) ? false : true;  
      }  
      public static boolean isPhoneNumber(EditText Et_Phonenumber) {  
           return Et_Phonenumber.getText().toString().isEmpty() ? false : true;  
      }  
      public static boolean isValidPhonenumber(EditText Et_valid_Phonenumber) {  
           return Et_valid_Phonenumber.getText().toString().length() != 10 ? false  
                     : true;  
      }  
      public static boolean isAddress(EditText Et_Address) {  
           return Et_Address.getText().toString().isEmpty() ? false : true;  
      }  
      public static boolean isDob(EditText Et_Dob) {  
           return Et_Dob.getText().toString().isEmpty() ? false : true;  
      }  
      public static boolean isCardNumber(EditText Et_CardNumber) {  
           return Et_CardNumber.getText().toString().isEmpty() ? false : true;  
      }  
      public static boolean isCardHolder(EditText Et_CardHolder) {  
           return Et_CardHolder.getText().toString().isEmpty() ? false : true;  
      }  
      public static boolean isAmount(EditText Et_Amount) {  
           return Et_Amount.getText().toString().isEmpty() ? false : true;  
      }  
      public static boolean isExpireMonth(Spinner Expire_Montht) {  
           return Expire_Montht.getSelectedItem().toString().equals("Month") ? false : true;  
      }  
      public static boolean isExpireYear(Spinner Expire_Year) {  
           return Expire_Year.getSelectedItem().toString().equals("Year") ? false : true;  
      }  
      public static boolean isCvvr(EditText Et_Cvvt) {  
           return Et_Cvvt.getText().toString().isEmpty() ? false : true;  
      }  
 }  

Registering with Google Cloud Messaging


  • Goto Google APIs Console page and create a new project. (If you haven’t created already otherwise it will take you to dashboard)


  • After creating project you can see the project id in url. Note down the project id which will be used as SENDER ID in android project. (Example: in #project/encoded-region-847 after semicolon encoded-region-847 is the sender id)


  • Once you are done, click on Credentials and Create new Key in Public API access and Select Browser key. Leave empty and Create key.


    This API key will be used when sending requests to GCM server.